 Table of Contents
 Developer's Manual
The following section will introduce the definition files for plug-ins and templates. It is demonstrated, how these files can be edited, in order to adapt them to personal needs.
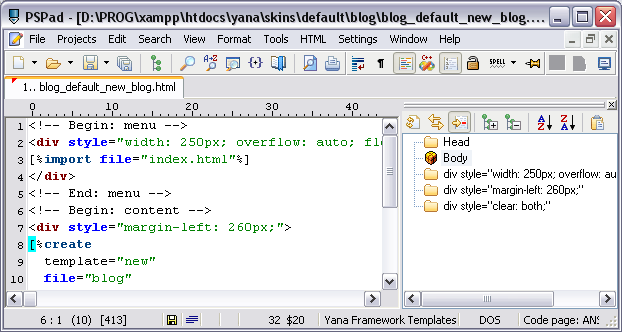
As the first step is to be demonstrated, how to insert smilies (emot-icons) and embedded tags (to format text). Open the file "skins/default/blog/blog_default_new_blog.html" in PSPad. Please note, that the text "blog" should be replaced with the name of your project. Select the highlighter "Yana Framework Templates" from the list of the available highlighters.
For comparison see the following figure:

Figure: Templates in PSPad
The function "import" loads the tree menu from the file "index.html". The function "create" calls the form generator of the Yana Framework, to generate a form, where the user may add a new item.
For an explanation of the function "create" see the reference of template-functions and -modifiers.
There are predefined code snippets for templates too. Now insert a function "embeddedTags" (Shortcut "embTag") below the function "create". You don't have to provide any arguments for this function.
For an explanation of the function "embeddedTags" see the reference of template-functions and -modifiers.
The source code should now look like this:
<!-- Begin: menu -->
<div style="width: 250px; overflow: auto; float: left;">
[%import file="index.html"%]
</div>
<!-- End: menu -->
<!-- Begin: content -->
<div style="margin-left: 260px;">
[%create
template="new"
file="blog"
table="blog"
where=$WHERE
titles=""
on_edit="blog_write_edit_blog"
on_delete="blog_write_delete_blog"
on_new="blog_write_new_blog"
on_search="blog_read_search_blog"
on_download="blog_blog_download"
sort=$SORT
desc=$DESC
page=$PAGE
entries=$ENTRIES %]
[%embeddedTags%]
</div>
<!-- End: content -->
<!-- Begin: foot -->
<div style="clear: both;">
<!-- your text here -->
</div>
<!-- End: foot -->
Compare the source code above with your result.
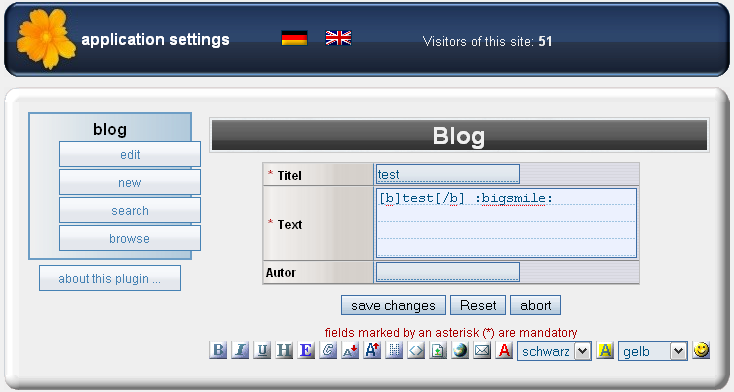
If you open your plug-in again in a browser, it should look like this.

Figure: Presentation in a browser (Firefox 3)
You may want to optimize this presentation for a better look and feel. There are many ways to do this and at most it is a matter of taste - however, here is a suggestion.
  <fieldset>
    <legend style="font-size: 12px; font-weight: bold;">Text formatieren:</legend>
    [%embeddedTags show="b,i,u,|,h,emp,code,hide,|,small,big,|,img,url,mail,-,mark,color,smilies"%]
  </fieldset>
If you haven't known the tags "fieldset" and "legend" till now: These tags produce subsections within forms. The tag "legend" specifies the label of the subsection. All "Fieldsets" are presented as framed sections. The text enclosed by the "Legend"-tag is printed at the border.
Also this source code demonstrates the use of arguments for the function "embeddedTags". Pay attention to the argument "show" of the function "embeddedTags". This accepts the two special values "|" and "-". Where "|" creates a vertical separator and "-" creates a line-break.
Finally let us create a preview of the new entry above both fieldsets (shortcut "preview"). You may take the snippet as is, the arguments "height" and "width" are not required and should be deleted.
The resulting source code should now look like this:
<!-- Begin: menu -->
<div style="width: 250px; overflow: auto; float: left;">
[%import file="index.html"%]
</div>
<!-- End: menu -->
<!-- Begin: content -->
<div style="margin-left: 260px;">
[%create
template="new"
file="blog"
table="blog"
where=$WHERE
titles=""
on_edit="blog_write_edit_blog"
on_delete="blog_write_delete_blog"
on_new="blog_write_new_blog"
on_search="blog_read_search_blog"
on_download="blog_blog_download"
sort=$SORT
desc=$DESC
page=$PAGE
entries=$ENTRIES %]
[%preview%]
<fieldset>
<legend style="font-size: 12px; font-weight: bold;">Text formatieren:</legend>
[%embeddedTags show="b,i,u,|,h,emp,code,hide,|,small,big,|,img,url,mail,-,mark,color,smilies"%]
</fieldset>
</div>
<!-- End: content -->
<!-- Begin: foot -->
<div style="clear: both;">
<!-- your text here -->
</div>
<!-- End: foot -->
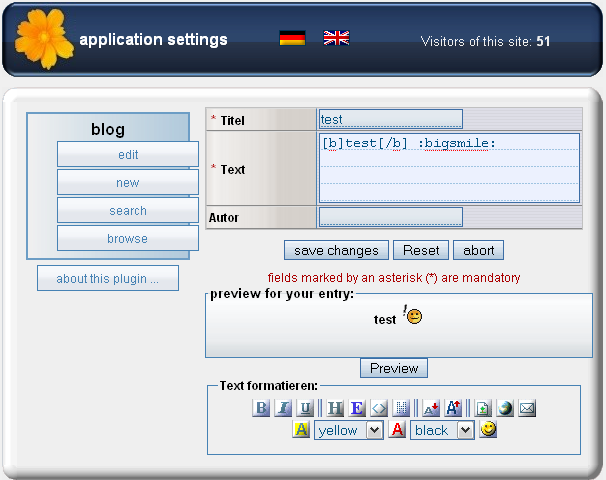
The preview automatically uses the most recently used textarea-field as the source for creating the preview. The representation is loaded via AJAX directly from the server, without having to reload the page.
The result will be presented in the browser as follows:

Figure: Presentation in a browser (Firefox 3)
Again click the menu option "browse". Note the sorting of the entries. By default they are sorted by the primary key in ascending order. This is usually not desired for a web log. Instead the entries should be sorted in descending order by the date of their creation. To correct this, open the file "skins/default/blog/blog_read_read_blog.html" in PSPad. Please note, that the text "blog" should be replaced with the name of your project. Select the highlighter "Yana Framework Templates" from the list of the available highlighters.
As stated before, the function "create" is used to call the form generator. This takes some parameters, which control the output. Set the parameter "sort" to "blog_created" to have the table sorted by the column "blog_created", which contains the date of creation. Set the parameter "desc" to the value "true", to get the results sorted in descending order.
Note that the parameter "where" is set to the variable "$WHERE". This will become important in a later stage of this tutorial.
The following source code snippet illustrates the result.
<!-- Begin: menu -->
<div style="width: 250px; overflow: auto; float: left;">
[%import file="index.html"%]
</div>
<!-- End: menu -->
<!-- Begin: content -->
<div style="margin-left: 260px;">
[%create
template="view"
layout=3
file="blog"
table="blog"
where=$WHERE
titles=""
on_edit="blog_write_edit_blog"
on_delete="blog_write_delete_blog"
on_new="blog_write_new_blog"
on_search="blog_read_search_blog"
on_download="blog_blog_download"
sort="blog_created"
desc=$DESC
page=$PAGE
entries=$ENTRIES %]
</div>
<!-- End: content -->
<!-- Begin: foot -->
<div style="clear: both;">
<!-- your text here -->
</div>
<!-- End: foot -->
Compare the source code above with your result.
Next the tree menu is to be adapted, so that the items "new" and "About ..." are only visible to users, who are logged in to the system and have a appropriate security level. You might want to change the text of the labels as well.
The source code should now look like this:
<ul class="menu root" id="_menu">
  <li class="menu">
    <div onclick="yanaMenu(this)">blog</div>
    <ul class="menu">
<!-- [%if $PERMISSION >= 75%] -->
      <li class="entry"><a href=[%"action=mein_plugin_read_edit_blog"|href%]>[%$LANGUAGE.MENU.EDIT%]</a></li>
<!-- [%/if%] -->
<!-- [%if $PERMISSION >= 0%] -->
      <li class="entry"><a href=[%"action=mein_plugin_default_new_blog"|href%]>[%$LANGUAGE.MENU.NEW%]</a></li>
<!-- [%/if%] -->
<!-- [%if $PERMISSION >= 0%] -->
      <li class="entry"><a href=[%"action=mein_plugin_read_search_blog"|href%]>[%$LANGUAGE.MENU.SEARCH%]</a></li>
<!-- [%/if%] -->
<!-- [%if $PERMISSION >= 0%] -->
      <li class="entry"><a href=[%"action=mein_plugin_read_read_blog"|href%]>[%$LANGUAGE.MENU.VIEW%]</a></li>
<!-- [%/if%] -->
    </ul>
  </li>
  <li class="entry"><a href=[%"action=about&target=mein_plugin&type=plugin"|href%]>[%$LANGUAGE.ABOUT%] ...</a></li>
</ul>
Having the IF-statements put in comments is a notation to improve the readability of the code when viewing the template file in a browser. For the template itself, it doesn't matter if you use these comments or not.
The variable $PERMISSION stores the security level of the visitor. Guests have by default the security level "0", Administrators are level "100". Between both you can assign more levels. For example, predefined is level "30" for the moderator's user group. Use this variable to decide, if certain menu items are to be visible or not. Now change the value "Permission" for the operations "new" and "about" to ">= 30" (the value 30 is by default used for the user group of moderators).
Since the variable $PERMISSION always has a value >= 0, you may remove all such checks to improve performance.
Compare your result with the following source code.
<ul class="menu root" id="_menu">
  <li class="menu">
    <div onclick="yanaMenu(this)">blog</div>
    <ul class="menu">
<!-- [%if $PERMISSION >= 75%] -->
      <li class="entry"><a href=[%"action=mein_plugin_read_edit_blog"|href%]>[%$LANGUAGE.MENU.EDIT%]</a></li>
<!-- [%/if%] -->
<!-- [%if $PERMISSION >= 30%] -->
      <li class="entry"><a href=[%"action=mein_plugin_default_new_blog"|href%]>[%$LANGUAGE.MENU.NEW%]</a></li>
<!-- [%/if%] -->
      <li class="entry"><a href=[%"action=mein_plugin_read_search_blog"|href%]>[%$LANGUAGE.MENU.SEARCH%]</a></li>
      <li class="entry"><a href=[%"action=mein_plugin_read_read_blog"|href%]>[%$LANGUAGE.MENU.VIEW%]</a></li>
    </ul>
  </li>
  <li class="entry"><a href=[%"action=about&target=mein_plugin&type=plugin"|href%]>[%$LANGUAGE.ABOUT%] ...</a></li>
</ul>
As you might have guessed already, this was just the 1st step. The menu options are hidden now. However the actions are still callable for someone who knows the right URL. A skillful user could do so to circumvent this check of his security level and execute the function anyway. The following section will demonstrate, how may change the configuration file of your plug-in, in order to prevent this.
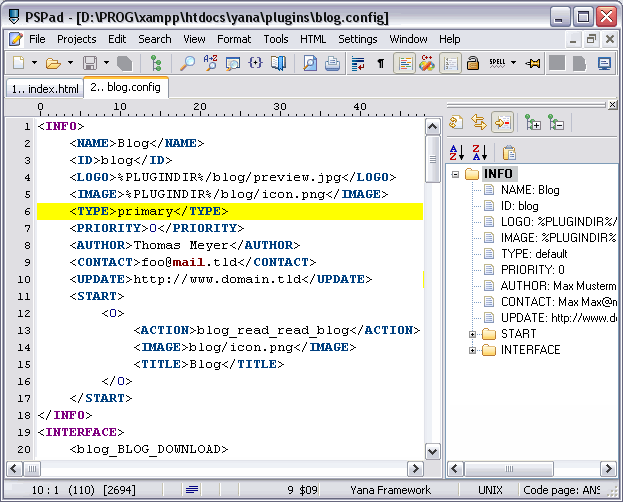
Off with HTML templates and on to configuration files. Open the file "plugins/blog.config" in PSPad (note, that the text "blog" should be replaced with the name of your project). Select the highlighter "Yana Framework"

Figure: Presentation of the configuration file in PSPad
The container "INFO" contains the header of the configuration file. This block may look a little different, depending on the settings you made when creating the plug-in.
First take a look at the element "START", where you will find the name of the front page of your plug-in (blog_read_read_blog). This value corresponds to the value of the argument "action", which is attached to the URL. The value identifies the plug-in and the action, which is to be carried out by the plug-in. The name was generated automatically. If you want to use another front page instead, just open the page you want in your browser. Look in the address in the browser, search for the value of the argument "action" and copy this value to the field "START".
The container "INTERFACE" describes all actions, that your plug-in can process. For each action there is a tag, which has further properties to describe it's characteristics. The names were also generated automatically. Note that the names must be unique. Therefor it doesn't make much sense to call an action something like "insert", since this would possible be used multiple times with different semantics.
For an explanation of all tags used in this configuration file, as well as code examples, see the developer's cookbook, chapter "editing plug-ins".
In the next step you will take over the changes you made in the file "index.html" to the configuration file, in order to make the circumvention of your security restrictions impossible.
To do so, first search for the action "blog_default_new_blog" and set the value of the field "PERMISSION" to "30", as you did in the file "index.html". Now do the same for "blog_write_new_blog". Note: The action "blog_default_new_blog" presents the form, while the action "blog_write_new_blog" handles the input from it. Both actions belong to the same form and this is why both values have to be changed accordingly.
The file "index.html" did contain the item "list" that you removed (compare with the source code above ). This item was linked with the action "blog_read_read_blog". Now look for this action and remove it.
The container "INTERFACE" should now look like this.
<INTERFACE>
	<BLOG_READ_EDIT_BLOG>
		<TYPE>read</TYPE>
		<MODE>0</MODE>
		<INSERT>BLOG_EDIT_BLOG</INSERT>
		<PERMISSION>75</PERMISSION>
		<ONSUCCESS>
			<GOTO>blog_read_edit_blog</GOTO>
		</ONSUCCESS>
		<ONERROR>
			<GOTO>blog_read_edit_blog</GOTO>
		</ONERROR>
	</BLOG_READ_EDIT_BLOG>
	<BLOG_WRITE_EDIT_BLOG>
		<TYPE>write</TYPE>
		<MODE>0</MODE>
		<TEMPLATE>MESSAGE</TEMPLATE>
		<PERMISSION>75</PERMISSION>
		<ONSUCCESS>
			<GOTO>blog_read_edit_blog</GOTO>
		</ONSUCCESS>
		<ONERROR>
			<GOTO>blog_read_edit_blog</GOTO>
		</ONERROR>
	</BLOG_WRITE_EDIT_BLOG>
	<BLOG_WRITE_DELETE_BLOG>
		<TYPE>write</TYPE>
		<MODE>0</MODE>
		<TEMPLATE>MESSAGE</TEMPLATE>
		<PERMISSION>75</PERMISSION>
		<ONSUCCESS>
			<GOTO>blog_read_edit_blog</GOTO>
		</ONSUCCESS>
		<ONERROR>
			<GOTO>blog_read_edit_blog</GOTO>
		</ONERROR>
	</BLOG_WRITE_DELETE_BLOG>
	<BLOG_DEFAULT_NEW_BLOG>
		<TYPE>default</TYPE>
		<MODE>0</MODE>
		<INSERT>BLOG_NEW_BLOG</INSERT>
		<PERMISSION>30</PERMISSION>
		<ONSUCCESS>
			<GOTO>blog_default_new_blog</GOTO>
		</ONSUCCESS>
		<ONERROR>
			<GOTO>blog_default_new_blog</GOTO>
		</ONERROR>
	</BLOG_DEFAULT_NEW_BLOG>
	<BLOG_WRITE_NEW_BLOG>
		<TYPE>write</TYPE>
		<MODE>0</MODE>
		<TEMPLATE>MESSAGE</TEMPLATE>
		<PERMISSION>30</PERMISSION>
		<ONSUCCESS>
			<GOTO>blog_read_read_blog</GOTO>
		</ONSUCCESS>
		<ONERROR>
			<GOTO>blog_default_new_blog</GOTO>
		</ONERROR>
	</BLOG_WRITE_NEW_BLOG>
	<BLOG_READ_SEARCH_BLOG>
		<TYPE>read</TYPE>
		<MODE>0</MODE>
		<INSERT>BLOG_SEARCH_BLOG</INSERT>
		<PERMISSION>0</PERMISSION>
		<ONSUCCESS>
			<GOTO>blog_read_search_blog</GOTO>
		</ONSUCCESS>
		<ONERROR>
			<GOTO>blog_read_search_blog</GOTO>
		</ONERROR>
	</BLOG_READ_SEARCH_BLOG>
	<BLOG_READ_READ_BLOG>
		<TYPE>read</TYPE>
		<MODE>0</MODE>
		<INSERT>BLOG_READ_BLOG</INSERT>
		<PERMISSION>0</PERMISSION>
		<ONSUCCESS>
			<GOTO>blog_read_read_blog</GOTO>
		</ONSUCCESS>
		<ONERROR>
			<GOTO>blog_read_read_blog</GOTO>
		</ONERROR>
	</BLOG_READ_READ_BLOG>
</INTERFACE>
Compare the source code above with your result.
 Thomas Meyer, www.yanaframework.net