Install plug-ins
Instructions
Plug-ins extend your application to include new functions.
To install an archive you got from the internet, do as follows:
- Unpack the archive, which contains the plug-in to the directory "plugins/" of the application. Be careful not to overwrite files, unless you are in the process of updating a plug-in to a newer version.
- Then, upload your changes to the Internet with your FTP program.
- Open your administration menu. Make sure you are logged in as the administrator and the expert mode is enabled.
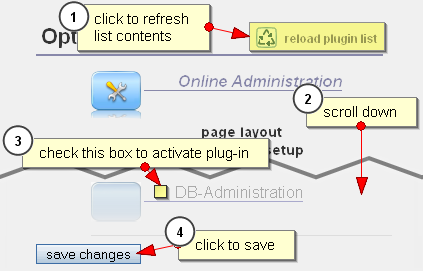
- In the right column, section "plugins", click on "refresh list." (see figure)
- The new plug-in will now appear in the list Activate it by clicking the check box next to it's name, so a little check mark appears.
- When you are done, click "Save changes".
- Some plug-ins have additional options. These options will appear automatically after activation.
To the deactivate the plug-in at a later stage, repeat the procedure and remove the check mark next to the name of the plug-in.

Figure: install new plug-in
The changes will take effect, the next time you start the program.
Troubleshooting
- If you are not able to see a menu "plugins", then probably the expert mode is not activated
- If you can't activate the expert mode, check whether the access rights have correctly been set during the installation of the program. Maybe a profile file in the directory "config/profiles" is write-protected.
- If you see the menu, but not the check boxes, you do not have sufficient rights for the installation. Ask an administrator to install it for you.
 Table of Contents
 Extensions
 Thomas Meyer, www.yanaframework.net