 Table of ContentsDeveloper's Manual
The Yana Framework provides several solutions to create foldable tree menus. Extensive programming is not required.
The following options are available:
For both variants, you have the choice between two different layouts. This chapter contains three sections. First you will be shown how to write the HTML source code for both menus 1 and 2 by hand. Then the text will demonstrate how to use the template function "printUnorderedList" to have these menus created automatically.
This section describes how to create a foldable menu directly in HTML. The Yana Framework will take care of the functionality and presentation automatically.
This is the 1st layout proposal. It uses JavaScript and CSS to display the menu. Following is a 2nd layout proposal, which can be used alternatively and uses exclusively CSS without JavaScript.
The layout is defined in the file "skins/default/styles/menu.css" and may be controlled by modification of the following CSS-classes:
The presentation of the menu corresponds to the current recommendations and should be accepted by search engines.
Proceed as follows:

Figure: Menu presentation
<ul class="menu root">
   <li class="entry"><a href="target.html">Link</a></li>
   <li class="menu">
       <div onclick="yanaMenu(this)">Menu 1</div>
       <ul class="menu">
           <li class="entry"><a href="1.html">Item 1</a></li>
       </ul>
   </li>
   <li class="menu">
       <div onclick="yanaMenu(this)">Menu 2</div>
       <ul class="menu">
           <li class="entry"><a href="2.html">Item 2</a></li>
<li class="menu">
           <div onclick="yanaMenu(this)">SubMenu 2.1</div>
               <ul class="menu">
                   <li class="entry">
<a href="2_1.html">Item 2.1</a>
</li>
                   <li class="entry">
<a href="2_2.html">Item 2.2</a>
</li>
                   <li class="entry">
<a href="2_3.html">Item 2.3</a>
</li>
             </ul>
           </li>
       </ul>
   </li>
   <li class="menu">
       <div onclick="yanaMenu(this)">closed</div>
       <ul class="menu" style="display: none;">
           <li class="entry"><a href="2.html">(invisible)</a></li>
       </ul>
   </li>
</ul>
The attribute "onclick" here triggers opening and closing of the menu. "Style" attributes set special properties, where "display: none" hides the menu. Menus are enclosed by an element of CSS-class "menu". Menu items are marked by an element of CSS-class "entry". The header of a menu is enclosed in "div" tags, which also have an attribute "onclick". By clicking the headline, the menu can be opened or closed.
Tip: it is usually easier to begin with a simple list of the tags "ul", "li" and add the CSS classes and JavaScript code later, rather than writing the menu line by line. This will keep the code clearer while editing.
There is the following predefinition: all menus are initially open, if they are not explicitly marked as closed. Multiple menus may be open at the same time.
If you want only 1 menu to be open at the same time, add the following source code:
 <script
type="text/javascript">

    yana_menu_auto_close = true;

</script>
If you want to have all menus closed at start, use the following code:
 <script
type="text/javascript">

    yanaCloseAll();

</script>
Both options can be combined.
 <script
type="text/javascript">

    yana_menu_auto_close = true;

    yanaCloseAll();

</script>
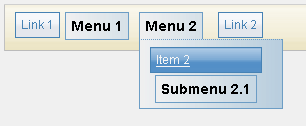
Figure: Menu presentation
<ul class="hmenu">
  <li class="entry">
    <a href="target.html">Link 1</a>
  </li>
  <li onmouseover="yanaHMenu(this,true)" onmouseout=
  "yanaHMenu(this,false)" class="hmenu">
    <div class="menu_head">
      Menu 1
    </div>

    <ul class="hmenu">
      <li class="entry">
        <a href="1.html">Item 1</a>
      </li>
    </ul>
  </li>
  <li onmouseover="yanaHMenu(this,true)" onmouseout=
  "yanaHMenu(this,false)" class="hmenu">
    <div class="menu_head">

      Menu 2
    </div>
    <ul class="hmenu">
      <li class="entry">
        <a href="2.html">Item 2</a>
      </li>
      <li onmouseover="yanaHMenu(this,true)" onmouseout=
      "yanaHMenu(this,false)" class="hmenu">
        <div class="menu_head">
          Submenu 2.1
        </div>

        <ul class="hmenu">
          <li class="entry">
            <a href="2_1.html">Item 2.1</a>
          </li>
          <li class="entry">
            <a href="2_2.html">Item 2.2</a>
          </li>
          <li class="entry">

            <a href="2_3.html">Item 2.3</a>
          </li>
        </ul>
      </li>
    </ul>
  </li>
  <li class="entry">
    <a href="3.html">Link 2</a>

  </li>
</ul>
The menu works with CSS and does not need JavaScript. However, JavaScript is used anyway, so that older browsers and browser with incomplete CSS support, such as Internet Explorer 6.0, are still able to view the page as expected.
Each menu is initially closed and will be temporarily opened when the user hovers it with the mouse.
The CSS classes have only few differences to those of the vertical menu. Just be sure to use the class "hmenu" instead of class "menu".
This is the 2nd layout proposal. The menus will open automatically when they are touched with the mouse. In Firefox, Opera and Co. opening and closing the menu is done entirely via CSS (without JavaScript). Only in Internet Explorer, including version 7, JavaScript has to be enabled, because the necessary CSS 2.1 pseudo-classes are not yet fully supported.
The layout is defined in the file "skins/default/styles/gui_array.css" and may be controlled via the following CSS classes:
Proceed as follows:
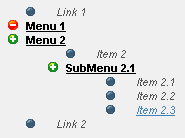
Figure: Menu presentation
<ul class="gui_array_list">
  <li class="gui_array_list">
    <a class="gui_array_value" href="target.html">Link 1</a>
  </li>
  <li class="gui_array_head"
      onmouseover="this.className='gui_array_head_open'"
      onmouseout="this.className='gui_array_head'">
    <span class="gui_array_key">Menu 1</span>
    <ul class="gui_array_list">
      <li class="gui_array_list">
        <a class="gui_array_value" href="1.html">Item 1</a>
      </li>
    </ul>
  </li>
  <li class="gui_array_head"
      onmouseover="this.className='gui_array_head_open'"
      onmouseout="this.className='gui_array_head'">
    <span class="gui_array_key">Menu 2</span>
    <ul class="gui_array_list">
      <li class="gui_array_list">
        <a class="gui_array_value" href="2.html">Item 2</a>
      </li>
      <li class="gui_array_head"
          onmouseover="this.className='gui_array_head_open'"
          onmouseout="this.className='gui_array_head'">
        <span class="gui_array_key">SubMenu 2.1</span>
        <ul class="gui_array_list">
          <li class="gui_array_list">
            <a class="gui_array_value" href="2_1.html">Item 2.1</a>
          </li>
          <li class="gui_array_list">
            <a class="gui_array_value" href="2_2.html">Item 2.2</a>
          </li>
          <li class="gui_array_list">
            <a class="gui_array_value" href="2_3.html">Item 2.3</a>
          </li>
        </ul>
      </li>
    </ul>
  </li>
  <li class="gui_array_list">
    <a class="gui_array_value" href="3.html">Link 2</a>
  </li>
</ul>
The attribute "onmouseover" is used to open the menus, and the attribute "onmouseout" to close them. These attributes are not mandatory, but are here for backward compatibility with the Internet Explorer and older browsers.
The template function "printUnorderedList" presents the contents of a multidimensional arrays as a menu.
To do this, 2 steps are required. Initially create an array containing the entries of your menu in the PHP source code of your plug-in. Then add the function "printUnorderedList" to your template to have the desired menu generated.
Proceed as follows:

Figure: Menu presentation
<?php
global $YANA;

$array = array(
  'target.html' => 'Link 1',
  'Menu 1' => array(
    '1.html' => 'Item 1'
  ),
  'Menu 2' => array(
    '2.html' => 'Item 2',
    'Submenu 2.1' => array(
      '2_1.html' => 'Item 2.1',
      '2_2.html' => 'Item 2.2',
      '2_3.html' => 'Item 2.3' ),
  ),
  '3.html' => 'Link 2'
);

$YANA->setVar('myMenu', $array);
?>
As you can see, the key to the arrays contain the URLs and the values contained the caption.
To generate the actual menu, proceed as follows:
For the parameter "value" provide the array containing the items of the menu. Use the parameter "layout" to choose between the 1st and 2nd layout. You should set the parameter "keys_as_href" to "true".
 Thomas Meyer, www.yanaframework.net
 Create multicolumn layouts